

T編最近在使用 ChatGPT 服務時,常常遇到欲貼上的內容過長,需要手動將輸入的文字分割後送出。因此請 ChatGPT 協助開發了一個能夠在網頁上使用的檔案上傳功能,可以將程式碼直接傳給ChatGPT做code review,或是把過長的文本內容一次交給他查看,增加不少便利性。
零、說明
本次將透過下方提示詞向 ChatGPT 請求協助,生成一段 JavaScript 腳本。這個腳本將創建一個「提交檔案」的按鈕,使其具備檔案上傳的功能,同時能夠自動分割文字內容,以便 ChatGPT 可以直接讀取我們的檔案。
一、提示詞
請撰寫一個JavaScript腳本,這個腳本要創建一個帶有‘Submit File’文字的按鈕,並將它插入到一個擁有‘.flex.flex-col.w-full.py-\\[10px\\].flex-grow.md\\:py-4.md\\:pl-4.relative.border.border-black\\/10.bg-white.dark\\:border-gray-900\\/50.dark\\:text-white.dark\\:bg-gray-700.rounded-xl.shadow-xs.dark\\:shadow-xs’類別的元素之前。該按鈕應有綠色背景,白色文字,5px的內邊距,無邊框,5px的邊框半徑以及5px的邊距。該腳本還應創建一個進度元素,並將其插入到同一元素之前。進度元素應有99%的寬度,5px的高度以及灰色的背景。在進度元素內部,應有另一個div元素代表進度條,其寬度為0%,高度為100%,背景為藍色。當點擊按鈕時,它應創建一個輸入元素,該元素的類型為‘file’,並接受‘.txt’, ‘.js’, ‘.py’, ‘.html’, ‘.css’, ‘.json’ 和 ‘.csv’ 類型的檔案。當選擇一個檔案後,應使用非同步讀取文件為文字,並將它分割成15000的chunk大小。每個塊應使用非同步提交到對話中方式如下:
async function submitConversation(text, part, filename) {
const textarea = document.querySelector(“textarea[tabindex=’0′]”);
const enterKeyEvent = new KeyboardEvent(“keydown”, {
bubbles: true,
cancelable: true,
keyCode: 13,
});
textarea.value = `Part ${part} of ${filename}: \n\n ${text}`;
textarea.dispatchEvent(enterKeyEvent);
}.
在每次提交chunk到for循環中之後,應該更新進度條,進度條的寬度應該根據提交的塊數量進行更新,更新的方式是:
progressBar.style.width = `${((i + 1) / numChunks) * 100}%`;
同時,我們也應該檢查chatgpt是否已經準備好,這可以通過下列代碼實現:
chatgptReady = false;
while (!chatgptReady) {
await new Promise((resolve) => setTimeout(resolve, 1000));
chatgptReady = !document.querySelector( “.text-2xl > span:not(.invisible)”
所有的chunk一旦全部提交完畢,進度條應該變成藍色。
二、製作Google Chrome Extension
獲取ChatGPT生成的JS代碼後,再請他協助將此代碼製作成Chrome插件,提示詞如下:
我想將這段程式碼做成Google Chrome Plugin,並且我希望在 https://chat.openai.com/ 網頁打開時就自動載入plugin。
請幫我生成以下檔案及檔案內容:
1. Manifest File (manifest.json) 2. Popup HTML File (popup.html) 3. Popup JavaScript File (popup.js) 4. Content Script File (content.js) 5. Background File (background.js)
三、成果演示
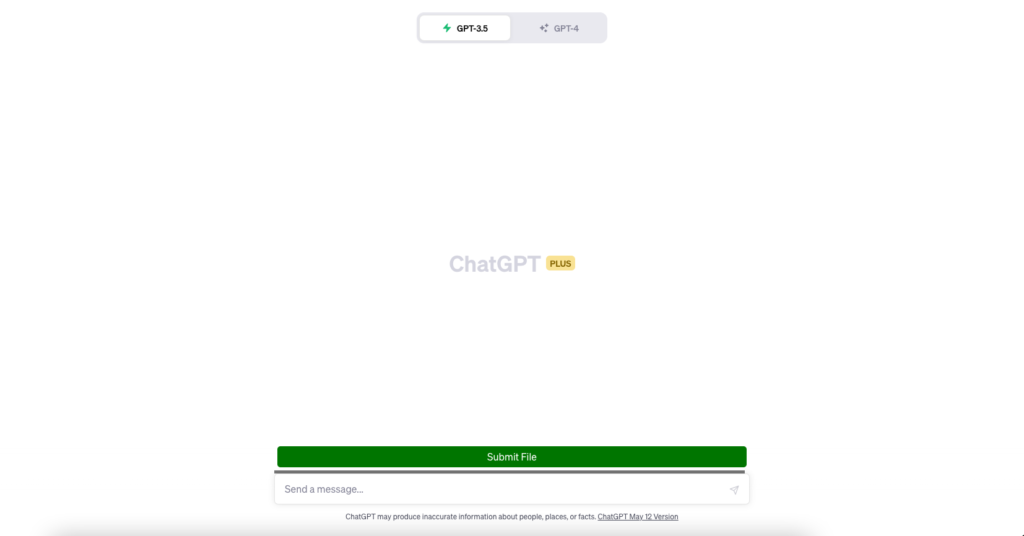
Plugin 成功載入
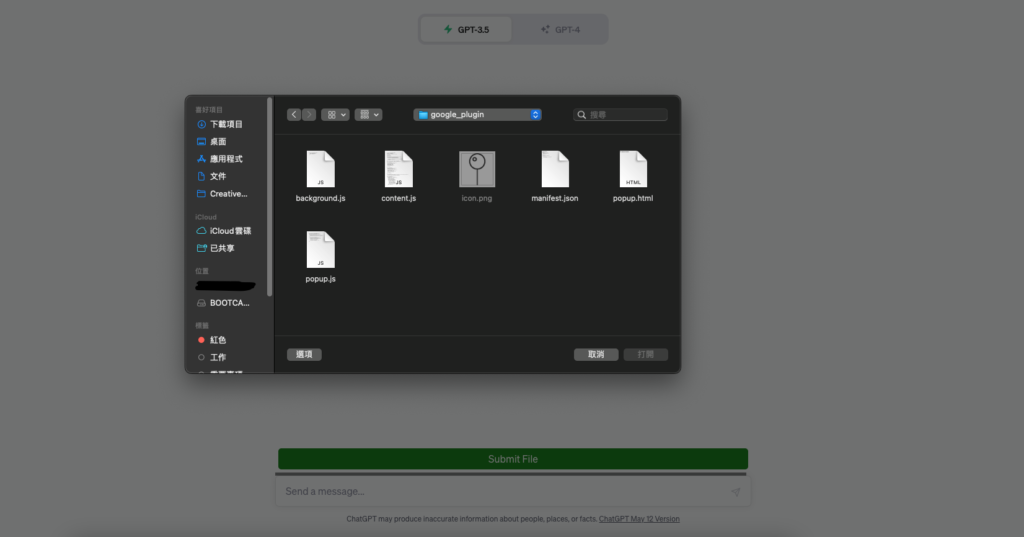
點選檔案上傳
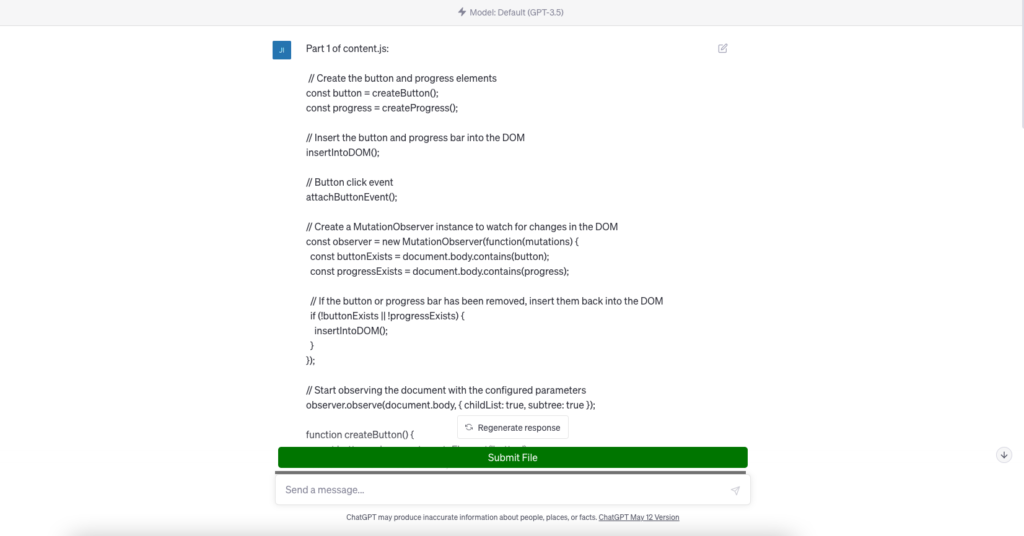
成功完成上傳content.js
四、總結
以上內容簡單演示了如何透過提示(Prompt)請 ChatGPT 快速的為我們完成一個便利的插件。然而,每次生成的程式碼可能會存在著些許差異,也可能在執行時出現錯誤訊息,此時可以依實際狀況再做調整,或是將錯誤訊息回傳給 ChatGPT,並按照指示處理,通常都能夠解決問題。最後,下方是 ChatGPT 實際生成的程式碼,供大家參考:
- Manifest File (manifest.json)
{
    "manifest_version": 3,
    "name": "File Uploader",
    "version": "1.0",
    "permissions": ["activeTab"],
    "action": {
        "default_popup": "popup.html",
        "default_icon": {
        "128": "icon.png"
        }
    },
    "background": {
        "service_worker": "background.js"
    },
    "content_scripts": [
        {
        "matches": ["https://chat.openai.com/*"],
        "js": ["content.js"]
        }
    ]
}- Popup HTML File (popup.html)
<!DOCTYPE html>
<html>
<head>
  <link rel="stylesheet" type="text/css" href="styles.css">
</head>
<body>
  <h1>File Uploader Extension</h1>
</body>
</html>- Popup JavaScript File (popup.js)
document.addEventListener('DOMContentLoaded', () => {
    const button = document.getElementById('submitBtn');
    const progressBar = document.querySelector('.progress-bar');

    button.addEventListener('click', () => {
        chrome.tabs.query({ active: true, currentWindow: true }, (tabs) => {
        chrome.tabs.executeScript(tabs[0].id, { file: 'content.js' });
        });
    });

    chrome.runtime.onMessage.addListener((message) => {
        if (message.type === 'progressUpdate') {
        const { currentChunk, totalChunks } = message.payload;
        const progress = (currentChunk / totalChunks) * 100;
        progressBar.style.width = `${progress}%`;

        if (currentChunk === totalChunks) {
            progressBar.style.backgroundColor = 'green';
        }
        }
    });
});- Content Script File (content.js)
// Create the button and progress elements
const button = createButton();
let progressBar;
const progress = createProgress();

// Insert the button and progress bar into the DOM
insertIntoDOM();

// Button click event
attachButtonEvent();

// Create a MutationObserver instance to watch for changes in the DOM
const observer = new MutationObserver(function(mutations) {
  const buttonExists = document.body.contains(button);
  const progressExists = document.body.contains(progress);

  // If the button or progress bar has been removed, insert them back into the DOM
  if (!buttonExists || !progressExists) {
    insertIntoDOM();
  }
});

// Start observing the document with the configured parameters
observer.observe(document.body, { childList: true, subtree: true });

function createButton() {
  const button = document.createElement('button');
  button.innerText = 'Submit File';
  button.style.backgroundColor = 'green';
  button.style.color = 'white';
  button.style.padding = '5px';
  button.style.border = 'none';
  button.style.borderRadius = '20px';
  button.style.margin = '5px';

  return button;
}

function createProgress() {
    const progress = document.createElement('div');
    progress.style.width = '99%';
    progress.style.height = '5px';
    progress.style.backgroundColor = 'grey';
    progress.style.borderRadius = '20px';
    progressBar = document.createElement('div');  // Update progressBar here
    progressBar.style.width = '0%';
    progressBar.style.height = '100%';
    progressBar.style.backgroundColor = 'blue';
    progressBar.style.borderRadius = '20px';
    progress.appendChild(progressBar);

    return progress;
  }

function insertIntoDOM() {
  const targetElement = document.querySelector('.flex.flex-col.w-full.py-\\[10px\\].flex-grow.md\\:py-4.md\\:pl-4.relative.border.border-black\\/10.bg-white.dark\\:border-gray-900\\/50.dark\\:text-white.dark\\:bg-gray-700.rounded-xl.shadow-xs.dark\\:shadow-xs');
  targetElement.parentNode.insertBefore(button, targetElement);
  targetElement.parentNode.insertBefore(progress, targetElement);
}

function attachButtonEvent() {
  button.addEventListener('click', () => {
    const input = document.createElement('input');
    input.type = 'file';
    input.accept = '.txt,.js,.py,.html,.css,.json,.csv';
    input.onchange = async (e) => {
      const file = e.target.files[0];
      const reader = new FileReader();
      reader.onload = async function(event) {
        const text = event.target.result;
        const chunkSize = 15000;
        const numChunks = Math.ceil(text.length / chunkSize);
        for (let i = 0; i < numChunks; i++) {
          const start = i * chunkSize;
          const end = start + chunkSize;
          const chunk = text.substring(start, end);
          await submitConversation(chunk, i + 1, file.name, progressBar);
          progressBar.style.width = `${((i + 1) / numChunks) * 100}%`;
        }
        progressBar.style.backgroundColor = 'blue';
      };
      reader.readAsText(file);
    };
    input.click();
  });
}

async function submitConversation(text, part, filename) {
    const textarea = document.querySelector("textarea[tabindex='0']");
    const enterKeyEvent = new KeyboardEvent("keydown", {
      bubbles: true,
      cancelable: true,
      keyCode: 13,
    });
    const chunkSize = 15000;
    const numChunks = Math.ceil(text.length / chunkSize);
    progressBar.style.width = `${((part) / numChunks) * 100}%`;
    textarea.value = `Part ${part} of ${filename}: \n\n ${text}`;
    textarea.dispatchEvent(enterKeyEvent);
    let chatgptReady = false;
    while (!chatgptReady) {
      await new Promise((resolve) => setTimeout(resolve, 1000));
      chatgptReady = !document.querySelector(".text-2xl > span:not(.invisible)");
    }
}- Background File (background.js)
chrome.action.onClicked.addListener((tab) => {
    chrome.scripting.executeScript({
        target: { tabId: tab.id },
        files: ['content.js']
    });
}); ![]()