

眾所皆知Http協議是單向的由用戶端(Browser;Client)向服務端發送請求,再由服務端(Server)回覆,不過在當我們有些實務應用(例如最常見的即時聊天室、共同編輯、訊息推播…等應用),需要由Server主動向Client發送資訊該怎麼辦呢?
所以本次將介紹如何在Django透過Channels啟動Socekt功能,達到雙向互動.
一、準備工作
我想怎麼安裝Django以及啟動就不特別說明,不過這次要用到的套件為Channels記得安裝.
pip install channels==3.0.4 #T編使用4.x有些問題,這邊就先採用3.0.4版本二、設定相關資訊
1.在專案settings.py中加入Channels
INSTALLED_APPS = [
    "django.contrib.admin",
    "django.contrib.auth",
    "django.contrib.contenttypes",
    "django.contrib.sessions",
    "django.contrib.messages",
    "django.contrib.staticfiles",
    "channels",
]
2.同樣在settings.py加入ASGI,主要是原生Django採用WSGI,當要使用websocket會採用異步方式,所要啟用ASGI
WSGI : Web Server Gateway Interface 網頁閘道器介面
ASGI: Asynchronous Server Gateway Interface 異步閘道器介面
Ref: 凡寫過必留下痕跡
ASGI_APPLICATION = "demosocket.asgi.application" #很重要一個點xxx.asgi.application中xxx是專案的名稱3.此時會發現啟動Django的畫面不同了
WSGI
Django version 4.1.4, using settings 'demosocket.settings'
Starting development server at http://127.0.0.1:8000/
Quit the server with CONTROL-C.
ASGI
Django version 4.1.4, using settings 'demosocket.settings'
Starting ASGI/Channels version 3.0.4 development server at http://127.0.0.1:8000/
Quit the server with CONTROL-C.
三、建立APP與畫面
1.建立app
django-admin startapp web2.建立路由
urlpatterns = [
    path("web/", web.views.index),
]
3.建立基本頁面
<!DOCTYPE html>
<html lang="en">
<head>
    <meta charset="UTF-8">
    <title>Title</title>
    <style>
        .message{
            height:300px;
            border: 1px solid #dddddd;
            width: 100%;
        }
    </style>
</head>
<body>
<div class="message" id="message"></div>
<div>
    <input type="text" placeholder="請輸入" id="txt">
    <input type="button" value="送出" onclick="sendMessage()">
    <input type="button" value="關閉" onclick="closeConn()">
</div>
4.建立View
from django.shortcuts import render
def index(request):
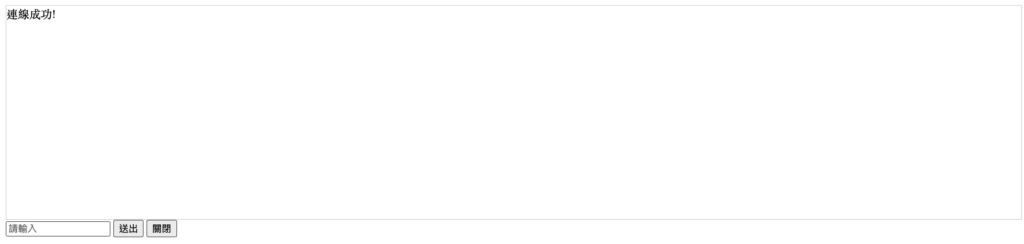
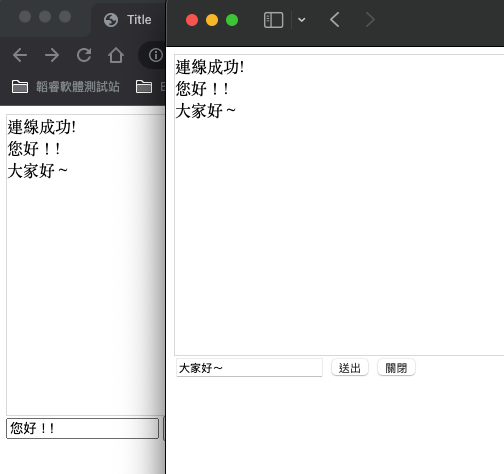
return render(request, 'index.html')5.做好以上,啟動服務應該可以看到下面的畫面(連線成功字樣後續會提及)
四、建立Websocket與路由
1.在專案目錄下建立routings.py
from django.urls import re_path
from web.Consumers.consumers import ChatConsumer #稍後自行建立的consumers.py

websocket_urlpatterns =[
	re_path(r'chat/', ChatConsumer.as_asgi()),
]
3.在專案目錄下找到asgi.py修改為
from channels.routing import ProtocolTypeRouter, URLRouter
from demosocket import routings

application = ProtocolTypeRouter({
	"http": get_asgi_application(),
        "websocket": URLRouter(routings.websocket_urlpatterns),
})
4.建立consumers.py
from channels.generic.websocket import WebsocketConsumer
from channels.exceptions import StopConsumer


CONN_LIST = [] #本次展示群發功能,不採用lays用法,所以需要裝載所有連接的客戶資訊
class ChatConsumer(WebsocketConsumer):

    def websocket_connect(self, message):
        #有客戶端來向後端發送ws自動觸發
        print('有人來連接')
        self.accept() #後端允許連結
        CONN_LIST.append(self)

    def websocket_receive(self, message):
        #瀏覽器基於ws傳送資料,自動觸發接受消息(message)
        print('接收瀏覽器的訊息-->', message['text'])
        text = message['text']
        res ="{}".format(text)
        for conn in CONN_LIST:
            conn.send(res)

        if text == 'close':
            self.send('你要求我關閉喔!')
            self.close() #後端自動斷開
            #raise StopConsumer()  # 後端不允許連結,就不會執行websocket_disconnect
            return

    def websocket_disconnect(self, message):
        #客戶端離線就觸發
        print('客戶端斷開')
        CONN_LIST.remove()
        raise StopConsumer() #後端不允許連結
五、準備進行測試
1.別急,我們還沒設定連結websocket功能,這邊只需要在剛剛index.html介面,透過Javascript進行觸發即可
...html資訊略
<script>
var socket = new WebSocket("ws://127.0.0.1:8000/chat/");
//回調函數,建立好連線後自動觸發(self.accept)
socket.onopen = function(event){
let tag = document.createElement('div');
tag.innerText = '連線成功!';
document.getElementById('message').appendChild(tag);
}
//回調函數,接收後端來的資訊自動觸發
socket.onmessage = function(event){
let tag = document.createElement('div');
tag.innerText = event.data;
document.getElementById('message').appendChild(tag);
}
//回調函數,後端主動斷開後會觸發
socket.onclose = function(event){
let tag = document.createElement('div');
tag.innerText = '被後端斷開';
document.getElementById('message').appendChild(tag);
}
//傳訊息
function sendMessage(){
let tag = document.getElementById('txt');
socket.send(tag.value);
}
//關閉
function closeConn(){
socket.close();
}
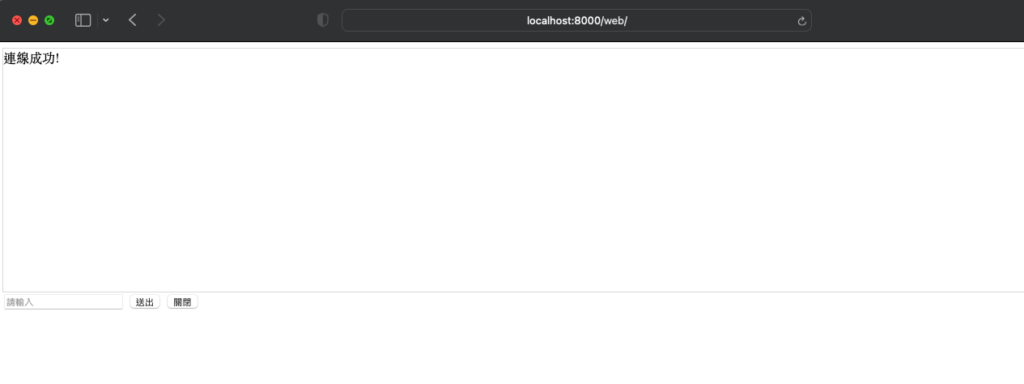
</script>2.啟動服務進入頁面http://localhost:8000/web/,應該就會看到服務連接到的訊息
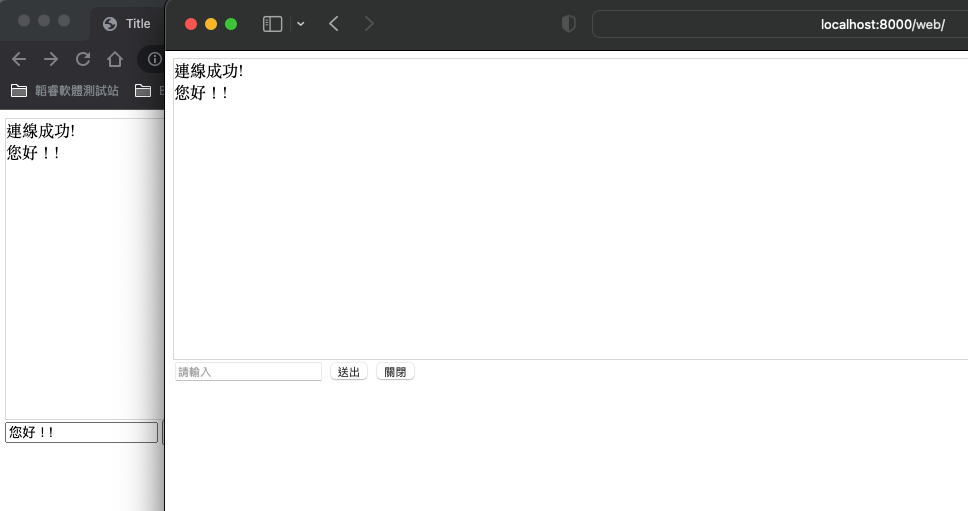
3.同時我們啟動另一個不同的瀏覽器,一樣網址,然後我們輸入一個訊息看看吧!
六、結語
以上就是最基本的WebSocket應用,這次介紹的是類似群發的功能,實務上的應用可能會有很多聊天群組,彼此是不會看到別的群組的訊息,這有機會T編在跟各位分享!
![]()