

在現代網路應用中,即時互動已成為不可或缺的功能。像是客服系統、團隊協作平台,遊戲聊天室,使用者都期待能在訊息送出後立即看到回應。然而,傳統的 HTTP Request/Response 模式天生不適合處理即時雙向溝通,往往需要額外的設計來支撐。
Django Channels 提供了 WebSocket 支援,讓我們能在 Django 框架中輕鬆建立即時通訊功能;而 Celery 則能處理背景任務,例如訊息的排程、通知推送、或是耗時的資料處理。兩者結合,不僅能打造一個簡易聊天室,更能為未來擴充(像是訊息儲存、推播、或 AI 分析)奠定基礎。
本文將示範如何:
- 使用 Django 打造一個簡易聊天室介面與架構
- 使用 Channels 套件建立 WebSocket 連線,支援多人即時聊天
- 整合 Celery 處理背景任務,收集訊息到 Google Sheet,方便後續分析內容
透過這個專案,你將能快速掌握 Django 在即時應用上的可能性,並學會如何結合 Channels 與 Celery,讓系統既能即時互動,又能穩定處理後端任務。
一、建立一個 Django 專案
- 在電腦安裝 uv:
Windows (Powershell) 安裝指令為irm https://astral.sh/uv/install.ps1 | iex,
Mac/Linux 安裝指令為curl -LsSf https://astral.sh/uv/install.sh | sh - 安裝最新版 Python:
uv python install - 建立一個 Python 專案:
uv init <專案名稱>,
裡面比較重要的檔案就是 pyproject.toml,他會記錄我們安裝的所有套件。 - 執行
uv sync,
這會自動產生專案的虛擬環境 .venv 以及套件的同步記錄檔 uv.lock,這些東西是用來確保執行環境的獨立性,讓專案在不同電腦一樣能運行。 - 執行 main.py:
uv run main.py,
這是 uv 專案內建的執行檔,確保專案可以正常運行程式 (測試完後就可以刪掉檔案了,因為後面用不到) - 安裝 Django 相關套件:
uv add django - 建立 Django 專案結構:
uv run django-admin startproject <專案名>,
執行後我們的專案就會多出一個 Django 專案名稱的資料夾,這些將會是我們專案的核心設定,包含路由、伺服器、套件使用等。 - 進入 project_chatroom 資料夾,我們會看到一個同名的專案資料夾,以及一個 manage.py 的檔案,這是 Django 的指令庫,後續只要有任何 Django 相關的指令 (比如資料庫更新、伺服器啟動等),都是從這裡執行。
- 但同時有兩個同名資料夾,其實閱讀上不太容易理解,因此現在 Python 專案常見的作法是:將最外層的資料夾更名為 src,表示「用來存放 Django 專案的所有程式碼內容」。因此我們要先回到前一層資料夾,修改資料夾名稱,然後再進入 src 執行後續指令。
- 生成資料庫遷移檔案:
uv run manage.py makemigrations - 執行資料庫遷移:
uv run manage.py migrate,會建立預設的 sqlite 資料庫檔案,未來只要資料庫設定有更新,會需要經常重新執行步驟 10 和 11。 - 設定 superuser:
uv run manage.py createsuperuser - 運行伺服器:
uv run manage.py runserver(在終端機頁面按下 Ctrl+C 就會關閉伺服器。) - 這時我們可以用剛才建立的 superuser 登入 admin 後台,網址是
localhost:8000/admin。
只要看到這個畫面,就可以確定 Django 專案建立成功了!

二、開始建立 WebSocket 連線與聊天室內容
安裝所有需要用到的套件:uv add channels channels-redis daphne redis,
這其實是一次安裝了四個套件:
- channels:支援 Django 建立 Websocket 連線的套件
- channels-redis:channels 與 redis 互動的套件
- daphne:這是 daphne 本身的應用程式套件。
- redis:高效能的 記憶體型 key-value 資料庫,常用作快取、訊息佇列、session 儲存,這邊用來暫存資料為主。
請先確認你的電腦有安裝 Redis 應用程式,若還沒安裝,可透過 Redis 官方文件 的教學安裝在本地,或在 Docker 運行 Redis 的官方映像檔。
三、WebSocket 連線建置
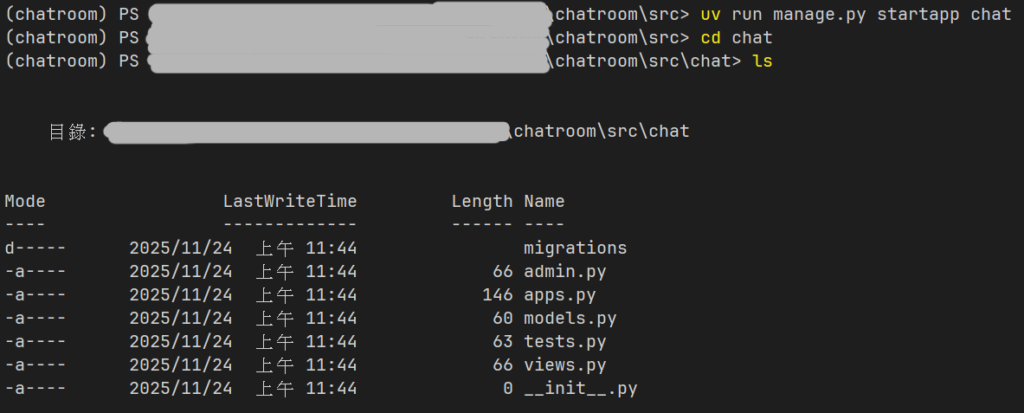
建立一個叫 chat 的 Django 應用程式 (APP):uv run manage.py startapp chat,這會建立以下的內容:
在 src/project_chatroom/settings.py 修改設定檔內容:
...
INSTALLED_APPS = [
    'daphne',                               # ASGI 介面伺服器
    'channels',                             # Websocket (需在 Django 內建 App 之前載入)
    'django.contrib.admin',
    'django.contrib.auth',
    'django.contrib.contenttypes',
    'django.contrib.sessions',
    'django.contrib.messages',
    'django.contrib.staticfiles',
    'chat'                                  # 自行建立的 APP
]

...

TEMPLATES = [
    {
        'BACKEND': 'django.template.backends.django.DjangoTemplates',
        # DIRS 保持空白,讓 Django 自動尋找每個 App 內部的 'templates' 資料夾
        'DIRS': [],
        'APP_DIRS': True,
        'OPTIONS': {
            'context_processors': [
                'django.template.context_processors.debug',
                'django.template.context_processors.request',
                'django.contrib.auth.context_processors.auth',
                'django.contrib.messages.context_processors.messages',
            ],
        },
    },
]

...

# 設定 ASGI 應用程式
ASGI_APPLICATION = 'project_chatroom.asgi.application'
WSGI_APPLICATION = 'project_chatroom.wsgi.application'

...

# 修改語言和時區設定
LANGUAGE_CODE = 'zh-hant'
TIME_ZONE = 'Asia/Taipei'
USE_I18N = True
USE_TZ = True

...

# --- Channels & Redis 設定 ---
CHANNEL_LAYERS = {
    "default": {
        "BACKEND": "channels_redis.core.RedisChannelLayer",
        "CONFIG": {
            "hosts": [("127.0.0.1", 6379)],
        },
    },
}
然後建立 consumers.py,配置 Channels 的消費者 (Comsumer) 設定。注意,這邊我們先不執行 Celery 的任務,著重在測試 channels 的事件消費處理上:
import json

from channels.generic.websocket import AsyncWebsocketConsumer
from datetime import datetime


class ChatConsumer(AsyncWebsocketConsumer):
    async def connect(self):
        self.room_name = self.scope['url_route']['kwargs']['room_name']
        self.room_group_name = f'chat_{self.room_name}'

        # 加入群組
        await self.channel_layer.group_add(
            self.room_group_name,
            self.channel_name
        )

        await self.accept()

    async def disconnect(self, close_code):
        # 離開群組
        await self.channel_layer.group_discard(
            self.room_group_name,
            self.channel_name
        )

    # 接收來自 WebSocket (前端) 的訊息
    async def receive(self, text_data):
        text_data_json = json.loads(text_data)
        message = text_data_json['message']
        username = text_data_json.get('username', 'Anonymous')

        now = datetime.now().strftime("%Y-%m-%d %H:%M:%S")

        # 廣播訊息給群組內的其他人
        await self.channel_layer.group_send(
            self.room_group_name,
            {
                'type': 'chat_message',
                'message': message,
                'username': username,
                'time': now
            }
        )

    # 接收來自群組的廣播
    async def chat_message(self, event):
        message = event['message']
        username = event['username']
        time = event['time']

        # 發送回 WebSocket (前端)
        await self.send(text_data=json.dumps({
            'message': message,
            'username': username,
            'time': time
        }))
然後就是一些路由和伺服器的配置了。先在 Django APP 資料夾 (chat) 建立一個 routing.py,這邊會用來設定 WebSocket 連線的路由。
from django.urls import re_path
from . import consumers

websocket_urlpatterns = [
    re_path(r'^ws/chat/(?P<room_name>\w+)/$', consumers.ChatConsumer.as_asgi()),
]
在 Channels 中,為了確保路由匹配的完整性和穩定性,通常需要明確使用 ^ (開頭) 和 $ (結尾) 來錨定正規表達式。
接著我們要設定 ASGI 伺服器的路由配置,Django 有提供 WSGI 和 ASGI 兩種伺服器設定,預設是使用 WSGI,但這只能處理 HTTPS 請求,不支援 WebSocket 請求,因此當專案有 WebSocket 連線的需求時,就會需要設定 ASGI 路由,並額外安裝 ASGI 伺服器 (如 uvicorn 或 daphne)
import os
import django

os.environ.setdefault('DJANGO_SETTINGS_MODULE', 'project_chatroom.settings')
django.setup()

from django.core.asgi import get_asgi_application
from channels.routing import ProtocolTypeRouter, URLRouter
from channels.auth import AuthMiddlewareStack
import chat.routing

application = ProtocolTypeRouter({
    "http": get_asgi_application(),
    "websocket": AuthMiddlewareStack(
        URLRouter(
            chat.routing.websocket_urlpatterns
        )
    ),
})
四、前端建置:Django Template Language (DTL)
雖然 Django 多數功能都是放在後端,但 Django 其實是一個「全端 (Full-Stack)」框架,也是有內建的前端渲染工具,就是 Django Template Language (DTL)。
首先我們先定義 Django Form,在 chat 建立一個 forms.py。雖然即時通訊(WebSockets)必須依賴 JavaScript,但我們可以把「HTML 結構」和「表單欄位定義」交給 Django 處理,讓程式碼結構更整潔、更符合 Django 的開發慣例。
from django import forms

class MessageForm(forms.Form):
    # 定義訊息輸入欄位
    message = forms.CharField(
        label='',  # 聊天室通常不顯示 "Message" 這樣的標籤
        widget=forms.TextInput(attrs={
            'id': 'chat-message-input',      # 設定 ID 讓 JS 可以選取
            'placeholder': '傳送訊息...',     # 提示文字
            'autocomplete': 'off',           # 關閉瀏覽器自動完成
            # 為了配合 IG 風格,我們在這裡直接移除預設邊框
            'style': 'border: none; background: transparent; width: 100%; outline: none; font-size: 14px;'
        })
    )
再來是在 chat 建立 views.py,定義一個 View,提供一個能建立表單,並將表單內容傳遞給網頁模板的接口:
from django.shortcuts import render
from .forms import MessageForm  # 引入剛剛建立的 Form

def index(request):
    return render(request, 'chat/index.html')

def room(request, room_name):
    # 從 URL GET 參數獲取使用者名稱,預設為 'Guest' (例如 ?username=ChromeUser)
    username = request.GET.get('username', 'Guest')

    # 實例化表單
    form = MessageForm()

    return render(request, 'chat/room.html', {
        'room_name': room_name,
        'username': username,
        'form': form  # 將表單物件傳遞給前端 Template
    })
接著到 project_chatroom 的 urls.py,建立 View 提供給外部使用者的路由 (沒有這個檔案就自己建一個):
from django.contrib import admin
from django.urls import path, include
from chat import views

urlpatterns = [
    path('admin/', admin.site.urls),
    # 首頁 (大廳)
    path('chat/', views.index, name='index'),
    # 聊天室頁面 (例如 /chat/room1/)
    path('chat/<str:room_name>/', views.room, name='room'),
]
接著在 chat 建立一個資料夾 templates,這部分是關鍵,因為這邊放的是前端頁面的模板,也就是用 Django Template Language (DTL) 結合 JavaScript 的關鍵,實際給使用者瀏覽與操作的介面。
這邊我們需要的頁面很簡單,就兩個:登入的首頁 (index.html):
<!DOCTYPE html>
<html lang="zh-Hant">
<head>
    <meta charset="utf-8"/>
    <meta name="viewport" content="width=device-width, initial-scale=1.0">
    <title>Chat Room Lobby</title>
    <style>
        body { font-family: sans-serif; display: flex; justify-content: center; align-items: center; height: 100vh; background-color: #fafafa; }
        .card { background: white; padding: 2rem; border-radius: 12px; box-shadow: 0 4px 6px rgba(0,0,0,0.1); width: 100%; max-width: 320px; text-align: center; }
        input { width: 100%; padding: 10px; margin: 10px 0; border: 1px solid #dbdbdb; border-radius: 4px; box-sizing: border-box; }
        button { width: 100%; padding: 10px; background-color: #0095f6; color: white; border: none; border-radius: 4px; font-weight: bold; cursor: pointer; }
        button:hover { background-color: #0085d6; }
    </style>
</head>
<body>
    <div class="card">
        <h2 style="margin-bottom: 20px;">進入聊天室</h2>

        <div style="text-align: left; font-size: 0.9rem; color: #666;">聊天室名稱</div>
        <input id="room-name-input" type="text" value="testroom">

        <div style="text-align: left; font-size: 0.9rem; color: #666; margin-top: 10px;">你的暱稱</div>
        <input id="username-input" type="text" value="User1">

        <button id="room-name-submit">進入</button>
    </div>

    <script>
        document.querySelector('#room-name-input').focus();

        // 按 Enter 也可以送出
        document.querySelector('#room-name-input').onkeyup = function(e) {
            if (e.key === 'Enter') document.querySelector('#room-name-submit').click();
        };

        document.querySelector('#room-name-submit').onclick = function(e) {
            var roomName = document.querySelector('#room-name-input').value;
            var username = document.querySelector('#username-input').value;

            if(roomName && username) {
                // 跳轉並帶上 username 參數
                window.location.href = '/chat/' + roomName + '/?username=' + username;
            } else {
                alert("請輸入完整資訊");
            }
        };
    </script>
</body>
</html>
和 聊天室的畫面 (room.html):
<!DOCTYPE html>
<html lang="zh-Hant">
<head>
    <meta charset="UTF-8">
    <meta name="viewport" content="width=device-width, initial-scale=1.0">
    <title>Chat - {{ room_name }}</title>
    <style>
        /* --- Instagram 風格 CSS --- */
        * { box-sizing: border-box; margin: 0; padding: 0; font-family: -apple-system, BlinkMacSystemFont, "Segoe UI", Roboto, Helvetica, Arial, sans-serif; }
        body { background-color: #fafafa; height: 100vh; display: flex; justify-content: center; align-items: center; }

        .chat-container {
            width: 100%; max-width: 400px; height: 100%; max-height: 800px;
            background-color: #fff; display: flex; flex-direction: column;
            border: 1px solid #dbdbdb;
        }
        @media (min-width: 768px) {
            .chat-container { height: 90vh; border-radius: 12px; box-shadow: 0 4px 12px rgba(0,0,0,0.1); }
        }

        /* Header */
        .header {
            padding: 16px; border-bottom: 1px solid #efefef; display: flex; align-items: center;
            background: #fff; z-index: 10;
            border-top-left-radius: 12px; border-top-right-radius: 12px;
        }
        .header h1 { font-size: 16px; font-weight: 600; margin-left: 10px; }
        .avatar-placeholder { width: 30px; height: 30px; border-radius: 50%; background: #ddd; }

        /* Messages Area */
        .messages-area {
            flex: 1; padding: 20px; overflow-y: auto; display: flex; flex-direction: column; gap: 8px;
            background-color: #fff; scrollbar-width: thin;
        }

        /* Message Bubbles */
        .message {
            max-width: 70%; padding: 10px 14px; font-size: 14px; line-height: 1.4;
            border-radius: 22px; position: relative; word-wrap: break-word;
        }
        /* 對方 (灰底) */
        .message.other { align-self: flex-start; background-color: #efefef; color: #262626; border-bottom-left-radius: 4px; }
        /* 自己 (藍底漸層) */
        .message.self { align-self: flex-end; background: linear-gradient(to right, #3797f0, #0084ff); color: white; border-bottom-right-radius: 4px; }

        .meta { font-size: 10px; margin-top: 4px; opacity: 0.7; }
        .self .meta { text-align: right; color: rgba(255,255,255,0.9); }
        .other .meta { text-align: left; color: #8e8e8e; }
        .sender-name { font-size: 10px; color: #888; margin-bottom: 2px; margin-left: 4px; }

        /* Input Area */
        .input-area { padding: 12px; display: flex; align-items: center; border-top: 1px solid #efefef; }
        .input-wrapper {
            flex: 1; background-color: #efefef; border-radius: 22px; padding: 8px 16px;
            display: flex; align-items: center;
        }

        /* Django Form Widget 樣式會直接套用,這裡設定按鈕 */
        button#chat-message-submit {
            border: none; background: transparent; color: #0095f6; font-weight: 600;
            font-size: 14px; cursor: pointer; margin-left: 8px; min-width: 40px;
        }
        button#chat-message-submit:hover { color: #00376b; }
    </style>
</head>
<body>

    <div class="chat-container">
        <div class="header">
            <div class="avatar-placeholder"></div>
            <h1>{{ room_name }}</h1>
        </div>

        <div id="chat-log" class="messages-area">
            <div style="text-align: center; color: #aaa; font-size: 12px; margin-top: 20px;">
                已以 <b>{{ username }}</b> 身分連線
            </div>
            <!-- 訊息會動態插入這裡 -->
        </div>

        <div class="input-area">
            <div class="input-wrapper">
                <!--
                    ★ 關鍵點:使用 Django Template Tag 渲染表單欄位
                    這會生成 <input type="text" id="chat-message-input" ...>
                -->
                {{ form.message }}

                <button id="chat-message-submit">傳送</button>
            </div>
        </div>
    </div>

    <!-- 將後端變數安全地轉為 JSON 供 JS 使用 -->
    {{ room_name|json_script:"room-name" }}
    {{ username|json_script:"user-name" }}

    <script>
        // 1. 讀取 Django 傳過來的資料
        const roomName = JSON.parse(document.getElementById('room-name').textContent);
        const myUsername = JSON.parse(document.getElementById('user-name').textContent);

        // 2. 建立 WebSocket 連線
        const chatSocket = new WebSocket(
            'ws://' + window.location.host + '/ws/chat/' + roomName + '/'
        );

        // 3. 監聽: 當收到後端訊息時
        chatSocket.onmessage = function(e) {
            const data = JSON.parse(e.data);
            const message = data.message;
            const sender = data.username;
            const time = data.time.split(' ')[1].slice(0, 5); // 只取時間 HH:MM

            const chatLog = document.querySelector('#chat-log');
            const messageDiv = document.createElement('div');

            // 判斷發送者是否為自己,決定樣式
            const isSelf = (sender === myUsername);
            messageDiv.classList.add('message', isSelf ? 'self' : 'other');

            let contentHtml = '';
            if (!isSelf) {
                contentHtml += `<div class="sender-name">${sender}</div>`;
            }
            contentHtml += `${message}<div class="meta">${time}</div>`;

            messageDiv.innerHTML = contentHtml;
            chatLog.appendChild(messageDiv);

            // 自動捲動到底部
            chatLog.scrollTop = chatLog.scrollHeight;
        };

        chatSocket.onclose = function(e) {
            console.error('Chat socket closed unexpectedly');
            alert("連線已中斷,請重新整理頁面");
        };

        // 4. 處理輸入框與發送邏輯
        const inputDom = document.querySelector('#chat-message-input'); // 這個 ID 是在 forms.py 定義的
        inputDom.focus();

        inputDom.onkeyup = function(e) {
            if (e.key === 'Enter') {
                document.querySelector('#chat-message-submit').click();
            }
        };

        document.querySelector('#chat-message-submit').onclick = function(e) {
            const message = inputDom.value;
            if (message.trim() !== "") {
                // 發送給後端 (Consumers)
                chatSocket.send(JSON.stringify({
                    'message': message,
                    'username': myUsername
                }));
                inputDom.value = '';
            }
        };
    </script>
</body>
</html>
⚠️ 注意:我們要將這兩份檔案放在 src/chat/templates/chat
乍看之下最後一層 chat 資料夾有點多餘,但這是因為要符合 Django 自動尋找 DTL 檔案的專案結構:名稱為 templates 的資料夾,裡面用 Django App 去做分類。
到這邊,理論上我們的聊天室就完成了。
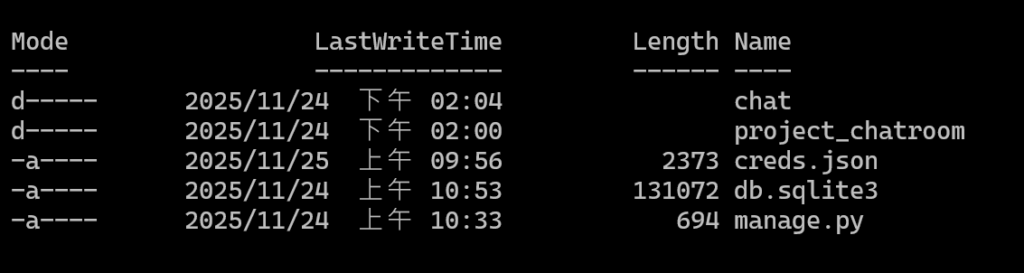
刪掉不會用到的檔案 (test.py 和 model.py),這時我們的 src 專案程式碼結構應該會長這樣:
src/
├── db.sqlite3
├── manage.py
│
├── project_chatroom/              <-- 【Django 專案主資料夾】
│   ├── __init__.py
│   ├── asgi.py
│   ├── settings.py
│   ├── urls.py                    <-- ★ (1) 總路由設定
│   └── wsgi.py
│
└── chat/                          <-- 【Chat 應用程式資料夾】
    ├── __init__.py
    ├── admin.py
    ├── apps.py
    ├── consumers.py
    ├── routing.py
    ├── forms.py                   <-- ★ (2) 表單定義檔 (新增)
    ├── views.py                   <-- ★ (3) 視圖邏輯 (修改)
    │
    ├── migrations/
    └── templates/                 <-- ★ (4) 模版資料夾 (新增)
        └── chat/                  <-- ★ (5) App 名稱資料夾 (這層很重要!)
            ├── index.html         <-- ★ (6) 首頁 HTML
            └── room.html          <-- ★ (7) 聊天室 HTML
五、測試專案運作
在終端機啟動 Daphne ASGI 伺服器 (Port 請根據實際運行的位址修改):daphne project_chatroom.asgi:application -p 8000

如果 Port 8000 已經被占用 (比如有其他應用程式正在運行),可以將執行指令改成 daphne project_chatroom.asgi:application -p 8001,改用 8001 或其他 Port 去運行。
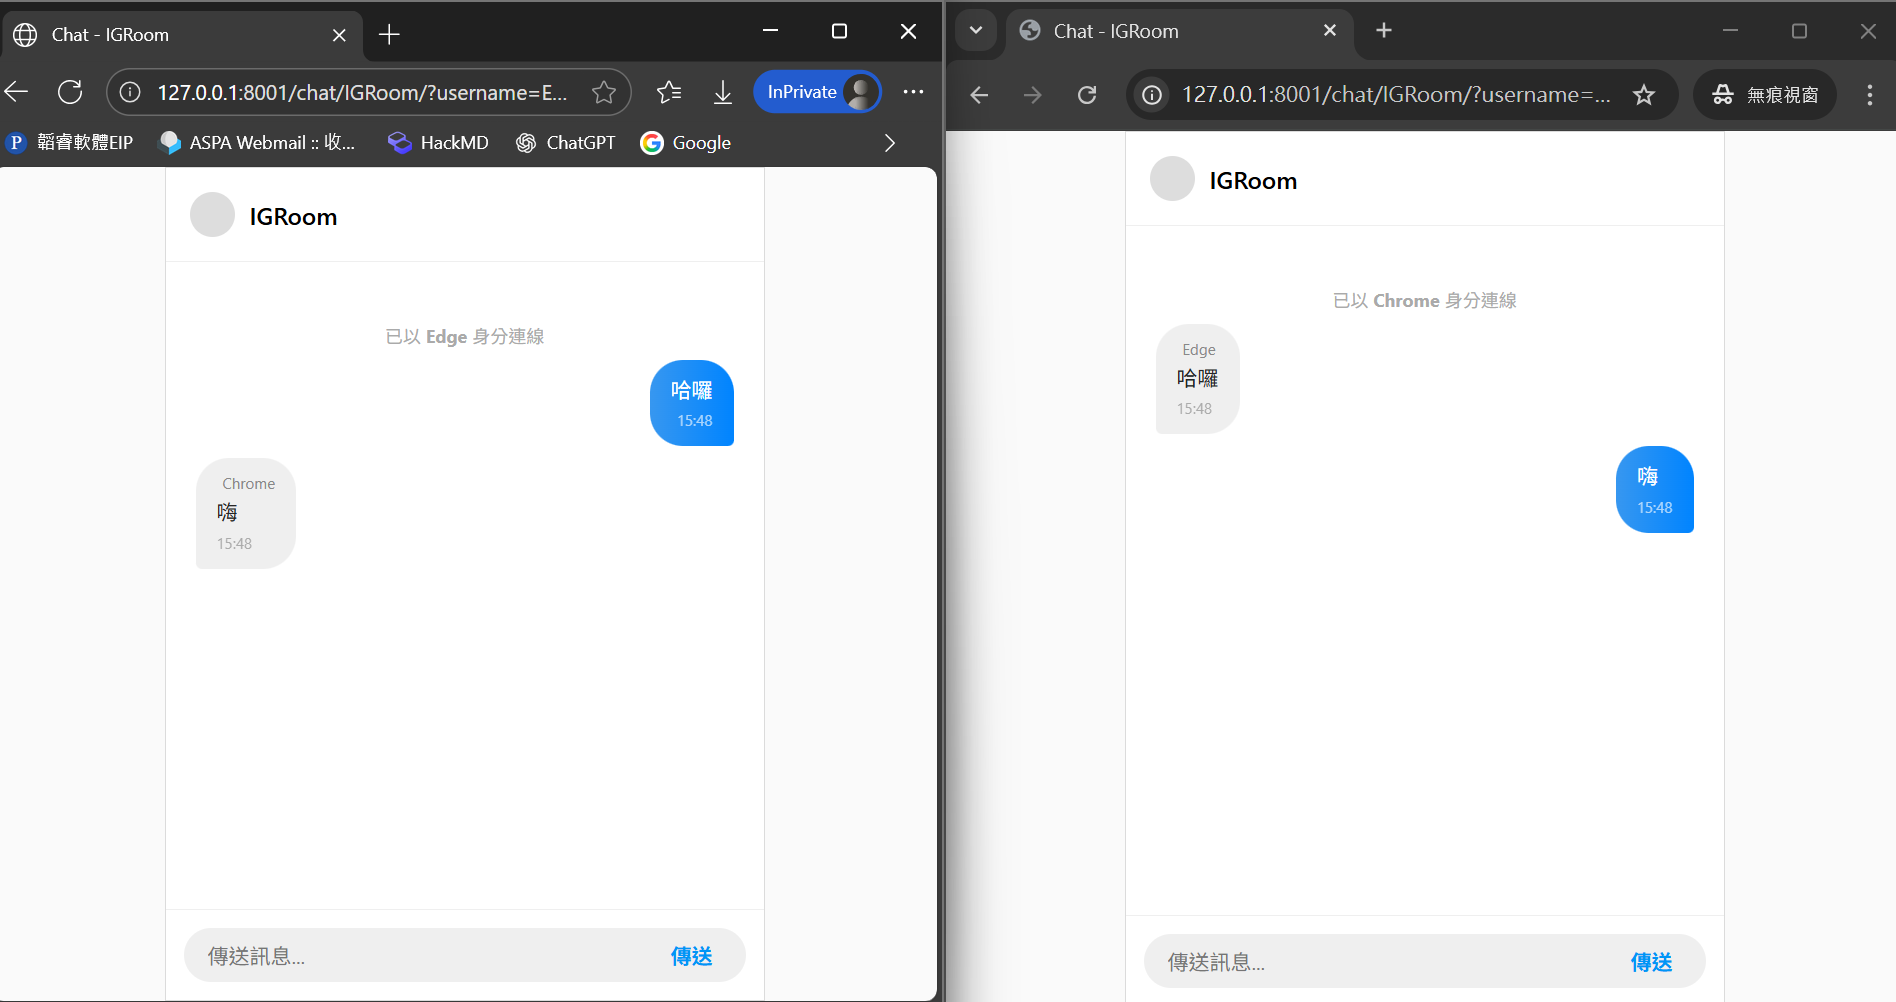
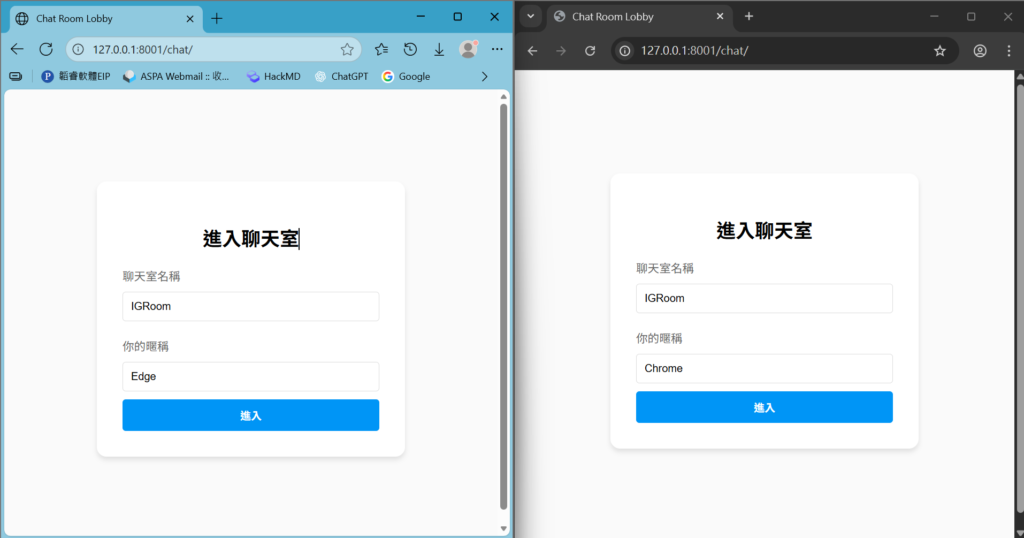
然後建立模擬使用者 Chrome:開啟 Chrome 瀏覽器進入 http://127.0.0.1:8000/chat/,輸入聊天室 IGRoom,暱稱 Chrome;另一模擬使用者 Edge:開啟 Edge 瀏覽器進入 http://127.0.0.1:8000/chat/,輸入聊天室 IGRoom,暱稱 Edge。
進入聊天室後,Edge 和 Chrome 就可以互相發送訊息了!

六、透過 Celery 收集留言內容
首先複習一下我們要用 Celery 完成的工作:
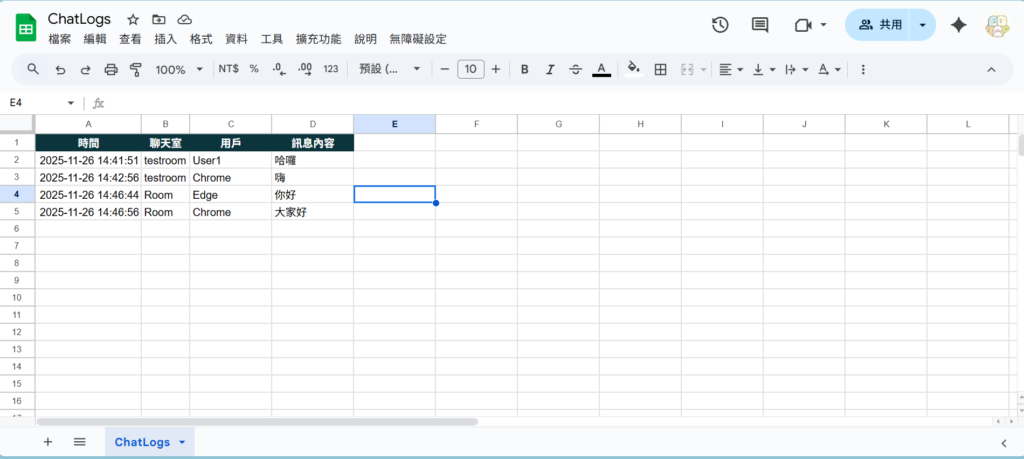
在訊息發送後,我們要將訊息的發送時間、發送的聊天室、留言者和留言內容,在不影響聊天室功能的情況下上傳到 Google Sheet 紀錄。
因此我們要在雲端硬碟建立一個新的試算表,並且為了讓資料可以寫入 Google Sheet,我們需要先完成一項前置作業:開啟 Google Sheet API 的權限。
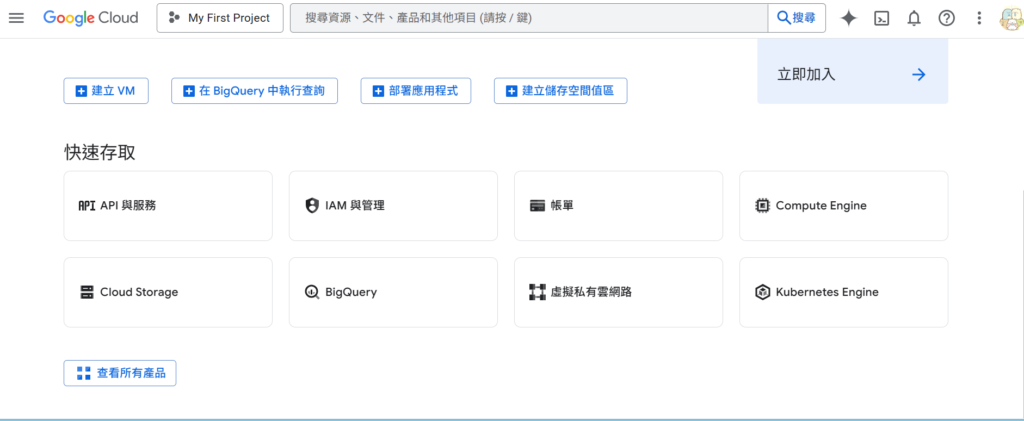
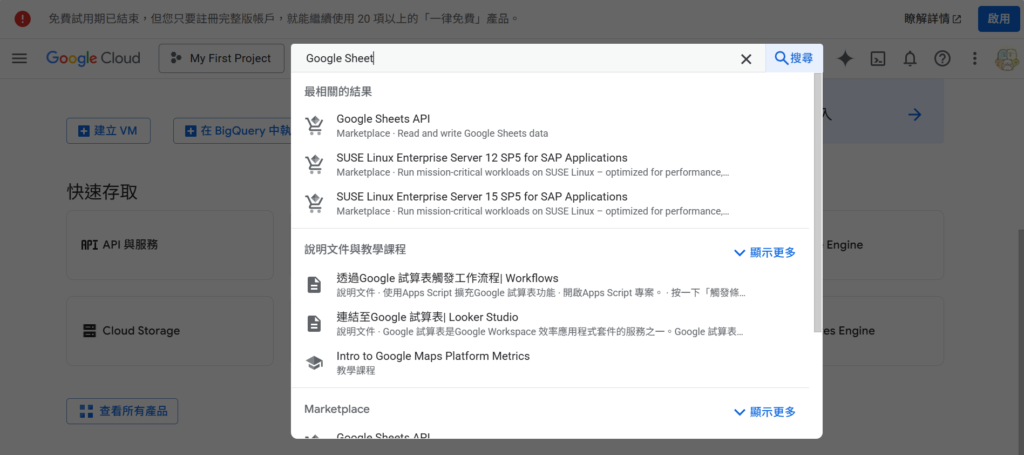
首先前往 Google Cloud Platform (GCP) Console,建立一個新的 GCP 專案,或是也可以用預設的 My First Project。
搜尋 Google Sheet API,然後選擇”啟用”。
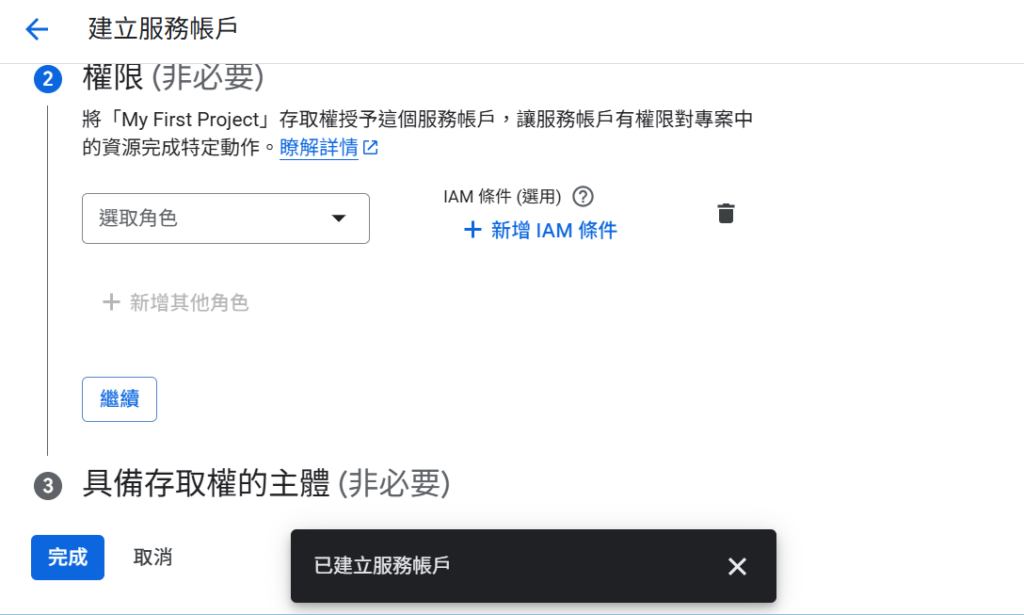
回到 GCP 首頁,選擇 “IAM 與管理” > “服務帳戶”,點選上方”建立服務帳戶”,這邊我們將服務取名為 chat_record (後面兩個與存取權無關的不用管他)
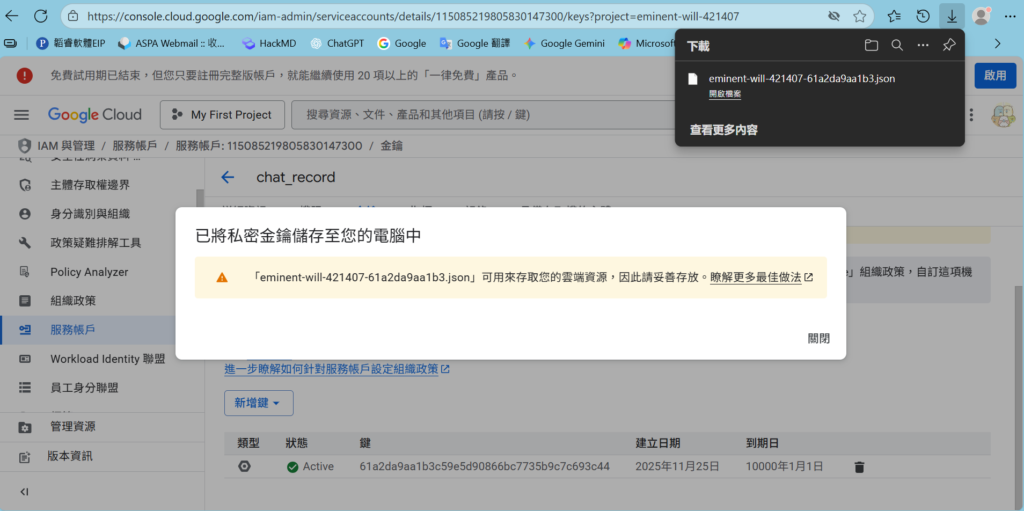
點擊名稱進入剛才建立的服務帳戶,選擇”金鑰” > “新增鍵” > “建立新的金鑰”,選擇建立 JSON 模式。

之後就會將金鑰下載到你的電腦裡面,這個檔案就是 creds.json,也就是我們在 settings.py 定義的 GOOGLE_CREDS_PATH 要用到的金鑰檔案。
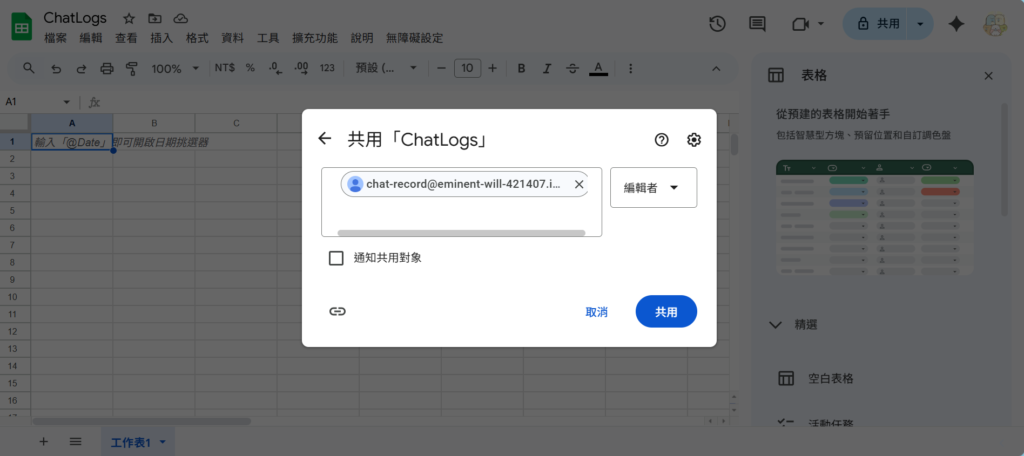
回到服務帳戶介面,複製帳戶的 Mail,然後打開 ChatLogs (就是我們在雲端硬碟建立的 Google Sheet),點選右上角”共用”,貼上我們剛才複製的服務用戶信箱,並將權限設為”編輯者”。
最後將下載的金鑰檔案改名為 creds.json,移動到 src 資料夾 (與 manage.py 同層),就完成 Google Sheet 的權限設定,理論上 Celery 任務就可以在背景順利地將聊天紀錄寫入 Google Sheet 了!
回到專案,安裝以下四個套件:uv add celery gspread oauth2client google-api-python-client。
- celery:
Python 的分散式任務佇列框架,用來處理 非同步任務 和 排程工作,把耗時的工作丟到背景執行。 - gspread:
一個 Python 套件,讓你能方便地操作 Google Sheets API。供簡單的介面來讀取、寫入、更新 Google 試算表。 - oauth2client:
Google 提供的 OAuth 2.0 驗證套件(雖然已經偏舊,官方建議改用 google-auth)。搭配 gspread,讓你的程式能透過 OAuth 2.0 驗證去操作 Google Sheets。 - google-api-python-client:
是 Google API 對 Python 客戶端提供權限的套件,通常需要單獨安裝。
基於前面建立的專案內容,在 settings.py 多加上 Celery 的配置:
...

ALLOWED_HOSTS = ['*']        # 為了測試方便,暫時允許所有主機連線,正式環境不建議這樣使用

...

INSTALLED_APPS = [
    'daphne',                               # ASGI 介面伺服器
    'channels',                             # Websocket (需在 Django 內建 App 之前載入)

    ...

    'chat',                                 # 自行建立的 APP
    'celery'                                #
]

...

# --- Celery 設定 ---
CELERY_BROKER_URL = 'redis://127.0.0.1:6379/0'
CELERY_RESULT_BACKEND = 'redis://127.0.0.1:6379/0'
CELERY_ACCEPT_CONTENT = ['json']
CELERY_TASK_SERIALIZER = 'json'
CELERY_TASK_ALWAYS_EAGER = False             # 確保任務真正進入佇列

# --- Google Sheet 設定 (請確保檔案存在) ---
GOOGLE_CREDS_PATH = BASE_DIR / 'creds.json'
GOOGLE_SHEET_NAME = 'ChatLogs'               # 確保 Google Drive 有這個工作表名稱的試算表,對,這是"工作表"的名稱
GOOGLE_SHEET_ID = '1XPT...zPwU'    # 試算表的唯一 ID
GOOGLE_SHEET_ID 就是試算表網址中間的 Hash。

然後建立 celery.py,這是讓 Celery 可以自動尋找任務的配置:
import os
from celery import Celery

# 設定 Django settings 模組
os.environ.setdefault('DJANGO_SETTINGS_MODULE', 'project_chatroom.settings')

app = Celery('project_chatroom')

# 從 settings.py讀取以 CELERY_ 開頭的配置
app.config_from_object('django.conf:settings', namespace='CELERY')

# 自動發現各個 app 下的 tasks.py
app.autodiscover_tasks()
接著在 Django 專案資料夾 (project_chatroom) 的 __init__.py,載入這份 Celery 的配置。
from .celery import app as celery_app

__all__ = ('celery_app',)
接著修改 consumer.py,讓 WebSocket 連線一收到訊息,就開始執行這段背景任務:
import json

from asgiref.sync import sync_to_async
from channels.generic.websocket import AsyncWebsocketConsumer
from datetime import datetime
from .tasks import save_message_to_sheet # 即使註釋,也需要保留 import


class ChatConsumer(AsyncWebsocketConsumer):

    ...

    # 接收來自 WebSocket (前端) 的訊息
    async def receive(self, text_data):
        text_data_json = json.loads(text_data)
        message = text_data_json['message']
        username = text_data_json.get('username', 'Anonymous')

        now = datetime.now().strftime("%Y-%m-%d %H:%M:%S")

        # 1. 呼叫 Celery Task (非同步寫入 Google Sheet)
        # ★ 修正 2: 使用 await sync_to_async 包裝,避免阻塞 ASGI 執行緒
        # ★ 修正 3: 將 self.room_name 加入 kwargs
        await sync_to_async(save_message_to_sheet.apply_async)(
            kwargs={
                "room_name": self.room_name,  # 確保傳遞房間名稱
                "username": username,
                "message": message,
                "timestamp": now
            }
        )

        # 2. 廣播訊息給群組內的其他人
        await self.channel_layer.group_send(
            self.room_group_name,
            {
                'type': 'chat_message',
                'message': message,
                'username': username,
                'time': now
            }
        )

    ...
然後是建立 tasks.py,在這裡設計具體的任務流程:
from project_chatroom.celery import app  # 引入 Celery 實例
from google.oauth2.service_account import Credentials
from googleapiclient.discovery import build
from googleapiclient.errors import HttpError  # ★ 新增:引入 Google API Client 的錯誤類型
from django.conf import settings
import logging
import os
import gspread  # 引入 gspread 以便於使用它的錯誤處理或功能 (但實際 API 呼叫使用的是 googleapiclient)

logger = logging.getLogger(__name__)

# Google Sheet API 範圍
SCOPES = ['https://www.googleapis.com/auth/spreadsheets']


@app.task(bind=True)
def save_message_to_sheet(self, room_name, username, message, timestamp):
    """
    將聊天訊息寫入 Google Sheet 的 Celery 任務。
    此任務在背景執行,以避免阻塞主 Web 服務。
    """
    try:
        # 1. 驗證金鑰路徑是否存在
        creds_path = settings.GOOGLE_CREDS_PATH
        if not os.path.exists(creds_path):
            logger.error(f"Google 服務帳戶金鑰未找到於: {creds_path}。請參閱指引文件。")
            return

        # 2. 載入憑證
        creds = Credentials.from_service_account_file(creds_path, scopes=SCOPES)

        # 3. 建立 Google Sheets API 服務 (使用 googleapiclient)
        service = build('sheets', 'v4', credentials=creds)

        # 4. 準備寫入資料
        data_to_write = [[
            str(timestamp),  # 確保時間戳記為字串格式
            room_name,
            username,
            message
        ]]

        # 5. 獲取試算表 ID 和名稱
        sheet_id = settings.GOOGLE_SHEET_ID  # 從 settings.py 中獲取
        sheet_name = settings.GOOGLE_SHEET_NAME  # 從 settings.py 中獲取

        # 6. 執行寫入操作 (使用 append 方式,從下一行開始寫入)
        logger.info(f"嘗試寫入訊息到 Google Sheet ID: {sheet_id}, Sheet: {sheet_name}")

        result = service.spreadsheets().values().append(
            spreadsheetId=sheet_id,
            # 寫入範圍。這裡使用 'A:D' 假設您的資料欄位是 A 到 D
            range=f"{sheet_name}!A:D",
            valueInputOption="USER_ENTERED",
            body={'values': data_to_write}
        ).execute()

        update_range = result.get('updates').get('updatedRange')
        logger.info(f"Celery 任務成功寫入 Google Sheet: {update_range}")

    except HttpError as e:  # ★ 修正:只捕捉 googleapiclient 拋出的 HttpError
        # 400 (Bad Request - 範圍錯誤) 或 403 (權限不足)
        # 這裡會捕捉到 "Unable to parse range" 錯誤 (400)
        logger.error(f"寫入 Google Sheet 發生 API 錯誤 ({e.resp.status}): {e.content.decode()}")

        # 只有在可能是暫時性問題時才重試 (例如:500/503 伺服器錯誤)
        if e.resp.status in (500, 503):
            logger.error("API 伺服器暫時性錯誤,嘗試重試...")
            raise self.retry(exc=e, countdown=15, max_retries=3)

        # 對於 400 (範圍錯誤) 或 403 (權限錯誤),不重試,因為問題在配置
        pass  # 讓任務失敗

    except Exception as e:
        # 捕捉其他所有未預期的錯誤
        logger.critical(f"寫入 Google Sheet 發生未預期的嚴重錯誤: {e}")
        # 不需要 self.retry(),直接讓任務失敗
到這邊我們就完成 Celery 的任務抓取設定與任務內容了。
現在,只要我們在聊天室發送訊息,就會推送 save_message_to_sheet 這個任務到 Message Broker (此處指的是 Redis),然後 Celery Worker 就會去抓取這個任務執行,過程都在背景執行,不會受到伺服器的其它請求順序影響)。
所以這邊我們會啟動兩個伺服器去測試:
- Daphne 伺服器
- Celery Worker:
celery -A project_chatroom worker -l info -P solo

和剛才一樣,模擬兩個聊天室對話的情況。但不同的是,現在還可以在 Google Sheet 看到留言內容。
這樣這個簡易聊天室專案就算大功告成了。
最後錄了一段短片 DEMO 整個聊天室的運作流程:
七、總結
透過這個簡易聊天室開發過程,我們可以了解 WebSocket 連線在現代應用程式的運作模式、設計架構,以及 Celery 在背景處理任務的優點與效用,還順便學到了如何與 Google Sheet 互動,自動調整試算表內容。
凡是需要「定時」、「長時間運作」或「獨立作業」的自動化任務,都很適合用 Celery 去處理。如果想再多了解 Celery 的原理與應用,可以參考他們的官方文件。
![]()